Red, White and Blue Popsicles (Coconut Berry Ice Pops)

Independence Day is just around the corner for us in the US. I love creating patriotic treats to celebrate and these Red, White and Blue popsicles are my go-to for this year. I am a sucker for pretty food and have fun making anything Red, White, and Blue. Remember this classic red, white and blue layered flag cake from a few years ago? Or this no-bake red, white and blue coconut mascarpone mousse? All so fun and perfect to celebrate this summer holiday.
Since the start of summer, my toddler has been obsessed with popsicles. He had his first popsicle at a friend’s house a few weeks earlier and I think he discovered he was missing out on something great. I’ve been making him homemade versions since then as it is easy for me to control what goes in.
These mango yogurt popsicles made with whole milk yogurt is one of my favorite ways to get protein into him. He also loves these Mango Kiwi Lemonade popsicles, although he prefers blueberries and strawberries in them. Can you tell he is tropical fruit fan?? I digress. Back to these red, white and blue popsicles that are actually coconut berry ice pops.

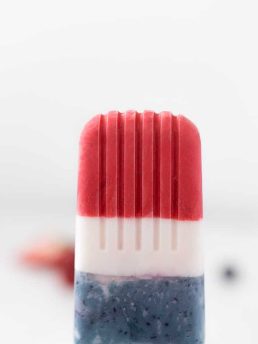
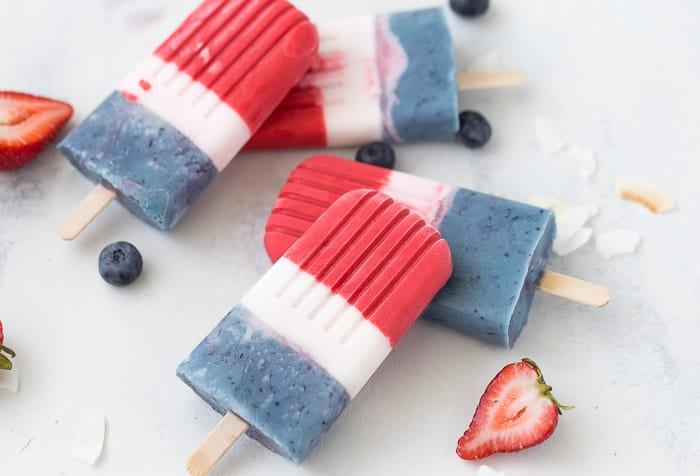
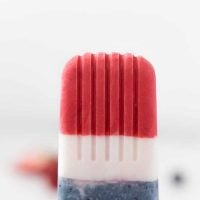
I love using coconut milk in smoothies and ice pops because it not only brings a tropical flavor to the party but also instantly makes your smoothie or popsicles creamy without needing to add yogurt. These coconut berry ice pops are made with coconut milk for the base and the white layer. Fresh strawberries or blueberries are then added into the coconut base for the red and blue layers. I added a few drops of red food coloring and blue food coloring for a brighter pop in color but you do not have to. You can use the natural color of your fruits.

These red, white and blue popsicles are extremely easy to make and to customize to any occasion. I can see these being cute for a birthday party and coordinated with your theme colors. They are a fun way to get the kids involved as well. If you are looking for an easy July 4th recipe, these coconut berry ice pops are perfect!
Red, White and Blue Popsicles
These red, white and blue popsicles are perfect for all your patriotric celebrations.
Ingredients
- 13.5 ounces coconut milk (1 can)
- 1 teaspoon pure vanilla extract
- 2 tablespoons sweetener (honey, agave nectar, maple syrup)
- 1/3 cup fresh strawberries, hulled and halved
- a few drops of red food coloring (optional)
- 1/3 cup fresh blueberries
- a few drops blue food coloring (optional)
Instructions
- In the bowl of a blender, combine all the white layer ingredients. Pulse until combined.
- Divide the mixture into three equal parts that will serve as the base for each layer. Chill one part until needed. Set the other two aside.
- To make the red layer, combine one of three parts with the strawberries and blend until strawberry is processed. Add in a few drops of red food coloring if using and blend to mix well. Transfer to a large measuring cup and chill until needed.
- Rinse out the blender. Combien another one of the three parts with the blueberries and blend until combined. Add in a few drops of royal blue food coloring if using and blend to mix well. Transfer to a large measuring cup and chill until needed.
- Pour the red mixture into your popsicle molds to form the first layer. Fill the popsicle molds a third of the way up. Freeze for at least 45 -60 minutes.
- Pour the white reserved mixture over the red. The red layer should be solid. If you see the white layer starts sinking into the red layer, it means it is not frozen yet. Stop and continue freezing the red layer before continuing. Remember you are filling the popsicle mold with the blue layer for another 1/3 of the way. Freeze for at least 45-60 minutes
- Repeat with the final layer, the blue layer. Freeze about 20 minutes before inserting popsicle sticks.
- Freeze until completely frozen, a few hours to overnight.
- To unmold, run under warm water for 30 seconds and release from the mold.
These are PERFECT! I love the real fruit used in your pops—and I need a batch today with this awful heat wave. thanks for sharing this amazing article and recipe.
I hope you enjoy it!
These are gorgeous and the perfect summer treat. Love all your recipes ❤️
Thanks, Lizzie!
These are PERFECT! I love the real fruit used in your pops—and I need a batch today with this awful heat wave 🙂
It is SO hot here today. I made another batch of this to cool down.
I still can’t over these popsicles – they are too cute! I love the flavor combination, too. I don’t have a popsicle mold, but I keep seeing tasty popsicles everywhere so I might have to break down and get a mold!
I love them too 🙂 You need a MOLD! Do it 🙂
I’m pretty sure I’m going to have to work on July 4th, so I’ve had ZERO motivation to come up with any red/white/and blue treats this year! I’ve been meaning to make some healthier popsicles for Remy, though, and these sound perfect!
Oh no 🙁 I am so sorry! But we are thankful for medical professionals like you! thank you for all you do 🙂