Easter Basketweave Cake (Step-by-Step Directions)

Hey there, and welcome back, friends.
You are in for a treat!
Basketweave Cake
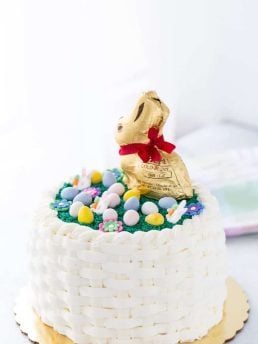
Creating a beautiful Easter basketweave cake is easier than you think with these step-by-step instructions. All you need are the right tools and buttercream frosting.
I have been making this cake in my head for years but I don’t seem to ever get it done. At first, it was a chocolate-covered strawberry basket cake that I had in mind for Valentine’s day; a strawberry cake with chocolate frosting in basketweave style topped with chocolate-covered strawberries.
Wouldn’t that be cute??
Yeah, that is what I thought but never got around to it year after year. Luckily, this year I got my act together and I am putting my piping skills to work with this Easter basketweave cake.
This basketweave cake will be great for any Easter celebration. You can easily redesign the topping for a great Mother’s Day cake.

A few years ago, I took Wilton’s cake decorating courses before I started this blog. And one of my favorite techniques we learned was basketweave piping.
It’s so elegant and great when you need to impress. Yet, it was so EASY. It’s one of those techniques that make people think you are a pro when really, it’s not that hard to get it.
The key to any buttercream piping design is GREAT consistent buttercream. You need to have a medium-consistent buttercream that is easy to work with to be able to create fluid designs.
I use my go-to whipped vanilla buttercream. It is silky smooth, stable, and consistent for piping designs. I use it for all my cake decorating as you can see in this strawberry rainbow cake. It colors great too (but use gel colors).
Basketweave Cake Ingredients
- One recipe for lemon cake or any cake of your choice
- unsalted butter
- powdered sugar
- pure vanilla extract
- heavy cream
- Green Jimmies
- Mini Cadbury Eggs
- Wilton Bunny Decorations
- Wilton Flower Icing Decorations
How to Make a Basketweave Cake
For the Cake:
- Bake cake according to the instructions of your recipe. Bake in either 8-inch or 9-inch round cake pans. Let cakes cool completely before frosting.
For the Frosting:
- In a large mixing bowl, whip the butter on medium speed with an electric mixer using the whisk attachment for about 6 minutes until light and fluffy. Stop the mixer and add the rest of the ingredients. Mix on low until just combined and then increase speed to medium-high and beat the frosting for another 6 minutes until light and fluffy.
Assembly:
- Place a layer of the cake onto a cake board or plate. Fill with a cup of the frosting and top with a second layer. If you have another cake layer, repeat the process. Frost your whole cake with a thin layer of frosting for a crumb coating. Chill cake for 20 mins.
- Attached Wilton Tip 47 to a decorating bag and fill the bag with frosting. To make the basket weave, follow the instructions in this video.
- But briefly, start by piping a vertical line from the top to the bottom of the cake. Then holding your bag at a 45 degrees angle, pipe horizontal lines over the vertical line, spacing the horizontal lines the same as the width of your tip. Pipe the next vertical line over the edges of your horizontal lines. Pipe the horizontal lines over the vertical line ensuring you bury your tip in between the lines. Continue piping lines and strips until you cover the entire cake.
- To finish the cake, use Tip 21 to pipe a border on top of the cake in a rope-like manner.
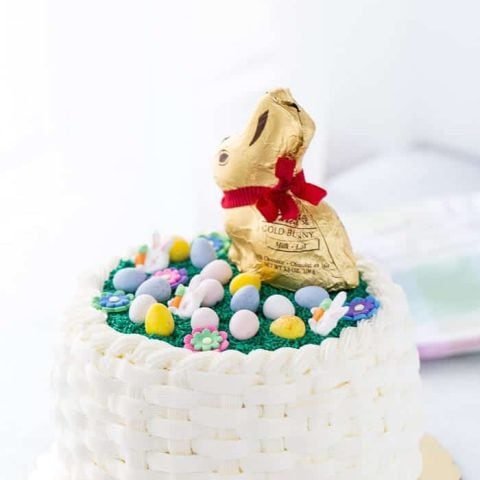
- To decorate, spread the green jimmies all over the top of the cake. Add the eggs, flowers, and decorations, including the chocolate bunny.

Basket Weave Cake Decorating
Once you have your perfectly whipped buttercream, the rest of this cake is pretty easy. You can use any cake recipe you like for the occasion. I used a lemon cake recipe I love since it is Spring after all.
But feel free to use your favorite cake recipe or box mix. Just bake your cake in at least two layers of 8-inch OR 9-inch round pans.
Basket Weave Piping Tip
Creating a basketweave design on a cake is simply piping vertical lines and strips in a series of coordinated steps. Using Wilton Tip 47 or Tip 48 (I used 48 because it is wider), you start with one vertical line and pipe horizontal strips over it, evenly spaced the width of your tip.
Then you pipe another vertical line over the edges of those horizontal strips.

The process continues until you cover the entire cake surface. Easy enough right? Don’t believe me? Check out this instructional video from Wilton.
If you are looking to practice your buttercream decorating skills, this cake and technique are for you. Trust me when I say it is definitely worth the time as you will WOW everyone with this cake.
Please let me know in the comments if you do try it or have any questions.

More Easter Recipes
What do you think of this amazing Easter cake recipe? What would you serve with a slice of this cake? Let me know in the comment section below.
If you share across social media, make sure to tag #aclassictwist, so I can see your beautiful creation come to life!
Happy baking, friends!
Basketweave Cake Recipe
Easter Basket Weave Cake
Creating a beautiful Easter basketweave cake is easier than you think with these step-by-step instructions. All you need are the right tools and buttercream frosting.
Ingredients
For the Cake:
- One recipe for Lemon Cake or any cake of your choice
- 2 cups (4 sticks) unsalted butter, softened at room temperature
- 4 cups powdered sugar, sifted
- 2 teaspoons pure vanilla extract
- 2-3 tablespoons heavy cream
- Wilton Tip 47 (basketweave) OR Tip 48 and Tip 21 (for the rope borders)
- Wilton Disposable decorating bags
- Green Jimmies
- Mini Cadbury Eggs
- Wilton Bunny Decorations
- Wilton Flower Icing Decorations
Instructions
For the Cake:
- Bake cake according to the instructions of your recipe. Bake in either 8-inch or 9-inch round cake pans. Let cakes cool completely before frosting.
For the Frosting:
- In a large mixing bowl, whip the butter on medium speed with an electric mixer using the whisk attachment for about 6 minutes until light and fluffy. Stop the mixer and add the rest of the ingredients. Mix on low until just combined and then increase speed to medium-high and beat the frosting for another 6 minutes until light and fluffy.
Assembly:
- Place a layer of the cake onto a cake board or plate. Fill with a cup of the frosting and top with a second layer. If you have another cake layer, repeat the process. Frost your whole cake with a thin layer of frosting for a crumb coating. Chill cake for 20 mins.
- Attached Wilton Tip 47 to a decorating bag and fill the bag with frosting. To make the basket weave, follow the instructions in this video.
- But briefly, start by piping a vertical line from top to bottom of the cake. Then holding your bag at a 45 degrees angle, pipe horizontal lines over the vertical line, spacing the horizontal lines the same as the width of your tip. Pipe the next vertical line over the edges of your horizontal lines. Pipe the horizontal lines over the vertical line ensuring you bury your tip in between the lines. Continue piping lines and strips until you cover the entire cake.
- To finish the cake, use Tip 21 to pipe a border on top of the cake in a rope-like manner.
- To decorate, spread the green jimmies all over the top of the cake. Add the eggs, flowers, and decorations, including the chocolate bunny.
Notes
NOTES:
- Keep the cake at eye level to ensure your lines are straight. I suggest using a rotating cake stand for ease.
- You can use the flat edge of the tip 47 for a different look or combine serrated side and flat edge for a combo look. I used tip 48 because it is wider and takes less time to go around the cake.
Fabulous piping! My easter plans are non-existent – it’s snuck up on me this year…
Sometimes it just sneaks up! But no plans are the best holidays.
Whoa! This cake is GORGEOUS! Talk about a wow factor for sure. And how much fun would this be at any easter celebration!
Thanks Ashley!!
The cuteness is killing me!! Gah, I can’t get over it.
Hhaha thank you!
What a beautiful cake! Love the basket weave design 🙂
Thanks Ashley!!
Gorgeous cake, Zainab!! I’ve never tried a basketweave cake, but yours is so pretty! I need to try it. Love the candy and everything on top, too cute! 🙂
Thanks Beth!! You need to try it!!
Oh my word! I took a couple Wilton’s decorating classes, too. I did NOT, however, come away with a technique as perfect as yours. This is a stunner of a cake! Have a wonderful week!
Those courses are fun right?? You just need to practice!!
i’ve been meaning to take a cake decorating class for years! all the times are funky, but it looks like so much fun. and glad you finally got around to making a cake with this method (:
It is so much fun!!
Oh I bet the Wilton’s cake decorating courses were so much fun and informative! Your decorating skills are totally on point girlfriend! Mine are terrible, so I’m positive my cake would look about 1/100th as beautiful… actually it would probably look like a hot mess. lol 🙂 You definitely make the basketweave piping look easy though! Great tutorial! And STUNNING cake! Cheers, friend!
Thank you girl! I had so much fun in those decorating courses but these were 4 years ago…before I started even baking, I knew I needed skills in decorating before I could attempt baking a cake hahah
Holy cow, this is one impressive cake! I haven’t made a basketweave cake in years, but you’ve totally inspired me to go hunting for my basketweave tips. Actually, scratch that whole idea…why don’t you just send me a slice of this amazing cake? I also love that you made this one a lemon cake…perfect for these (somewhat) warmer days! Now I’m going to be thinking about this cake all day long. Haha! 🙂
You should go hunting for them or buy them the next time you are at a craft store (only $2 or less!). It’s so fun!! But I will be more than happy to send you a slice. Lemon cake just made sense with Spring in the air!